Vercel Enterprise is required for custom certificates. Hobby and Pro cannot continue. QWAC.com checks the team plan before provisioning and again before deployment.
Before you start
This integration connects your website to verified organization identity—a foundation for your SEO and AEO strategy. See how QWAC fits into search and AI discovery.
- A Vercel Enterprise team and a verified production custom domain attached to its project
- A team-scoped Vercel access token with project/domain read and certificate management access
- Your own DigiCert Europe or Sectigo account enabled for the selected QWAC or EV product
- Access to your DNS provider to publish validation TXT records
- An active QWAC.com managed service and completed issuer business verification
Visitors receive the certificate issued for your organization from Vercel’s network. QWAC.com verifies the public TLS certificate after upload. Vercel does not need to move behind Cloudflare.
Account setup time does not include provider identity checks, certificate issuance, or managed-service activation.
Check your Vercel team and domain
- Confirm the team is on Enterprise. If it is on Hobby or Pro, contact Vercel to upgrade before ordering a certificate.
- Attach your custom domain to the production project and complete Vercel’s verification. Check the website works over HTTPS.
- Connect each hostname you want to certify. An apex redirect still needs valid SSL before the browser follows it. Preview and vercel.app domains are excluded.
The custom domain is verified and working in the Enterprise team.
Connect Vercel in QWAC.com
- Copy your team ID from Vercel Team Settings → General. Create an access token scoped to that team and paste both into QWAC.com.
- Select Connect Vercel. QWAC.com reads the team plan and loads its projects.
- Select your project and verified website hostname, then choose your certificate provider.
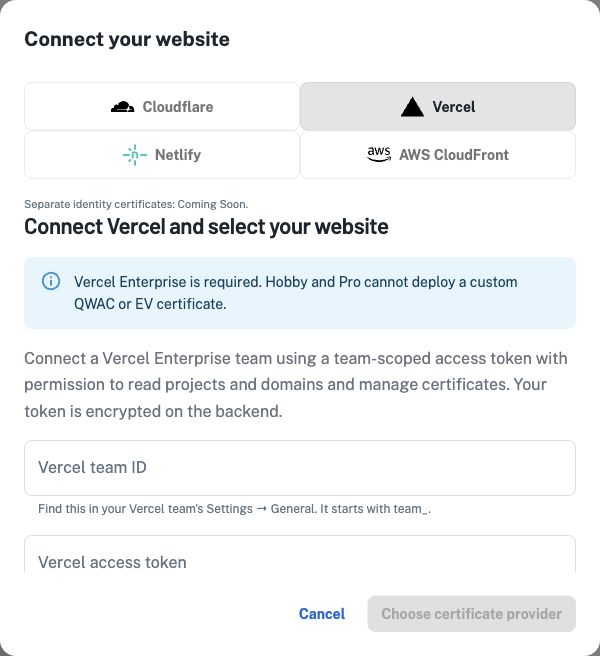
Tokens are encrypted on the backend. Choose an expiry that fits your security policy and replace the token before it expires. This connection uses a token, not OAuth.
Your website is linked to the correct Vercel team and project.
Choose your issuer and key management
- Connect DigiCert Europe using your API key and organization, or Sectigo using its enabled ACME directory and EAB credentials.
- Choose We host the key for managed deployment. The TLS key is envelope-encrypted with AWS KMS and decrypted in memory for Vercel upload.
- Or choose Bring your key and CSR. QWAC.com receives only the public CSR; you install every issued certificate directly in Vercel.
- Select your purchased QWAC or EV product, then review issuer terms and authorization before starting. Your issuer bills your own account.
Vercel does not use the Cloudflare-generated-key option. Use the product enabled on your issuer account.
The request is authorized for the selected product and key option.
Complete domain and business validation
- When a TXT challenge appears, add its exact name and value at the provider that manages your DNS.
- Select Check DNS after saving. We continue only after detecting the expected public value; your issuer makes the final validation decision.
- Complete any business checks or representative approval requested by your issuer. We email you when action is needed.
Vercel DNS changes are manual in this integration. New TXT records may be needed for every reissue; QWAC.com shows instructions and emails you each time.
The issuer approves and releases your certificate.
Deploy, verify, and keep it current
- For hosted keys, QWAC.com uploads the issued certificate, its matching key, and CA chain using Vercel’s API.
- For your own CSR, download the certificate and follow the manual installation steps below.
- Select Sync or verify installation. Active means public TLS serves the expected certificate, not just that an upload succeeded.
- Keep issuer access, the Vercel token, DNS access, and your managed service active. Review renewal alerts promptly.
Vercel serves an automatically generated certificate when a custom certificate is within five days of expiry. This may preserve HTTPS, but the QWAC identity is absent until its replacement is deployed. Uploading a certificate does not make Vercel renew it.
The certificate is deployed and verified; reissues are scheduled before expiry.
Bring your key and CSR
Keep your private key on your own system. QWAC.com needs only the public certificate signing request (CSR). Ask your administrator to generate an RSA-3072 key and a CSR for exactly your website hostname.
Example commands for your administrator
umask 077
openssl req -new -newkey rsa:3072 -nodes   -keyout example.com.key -out example.com.csr   -subj "/CN=example.com" -addext "subjectAltName=DNS:example.com"
Replace example.com with your selected hostname. Keep the .key file private and backed up. Only select the .csr file in QWAC.com.
- Choose your issuer, then Bring your key and CSR.
- Paste or select the public CSR. Connect your issuer account for the selected QWAC or EV product and authorize the request.
- When notified, download the issued certificate from your workspace.
- Open your Vercel team → Domains and upload a custom SSL certificate for the domain, including its matching private key and the issuer’s CA chain.
- Return to QWAC.com and select Verify Vercel installation. Repeat installation after every reissue.
Your key is uploaded directly to Vercel, which holds it for TLS serving. QWAC.com never receives it. This option does not use Keyless SSL.
Vercel installation instructions ↗Troubleshooting
My team cannot continue
Custom certificate upload requires Enterprise. Upgrade with Vercel, then select Recheck Vercel. Your QWAC.com subscription does not change the Vercel plan.
My domain is missing
Select the right team and project. The hostname must be a verified custom domain in production, not a preview, wildcard, or vercel.app domain.
The site still serves a different certificate
Allow propagation, then Sync again. A proxy in front of Vercel may terminate TLS and serve its own certificate. QWAC.com will not mark this as verified.
The upload outcome is uncertain
Contact support before retrying. We retain the upload intent to avoid a duplicate upload after an interrupted response.
Renewal needs a TXT record again
Domain validation can recur. Add the latest value at your DNS provider and select Check DNS. Keep unrelated records intact.
Official references
Provider screens and requirements change. These links are the source of truth for their platform settings.
Vercel custom SSL requirements and fallbackVercel certificate upload APIVercel Enterprise planKeep this guide handy.
Start with your hosting account, then choose your issuer and how to manage your key.
Register your interest