
You need Business or Enterprise on your own Cloudflare domain to deploy the QWAC. Your host’s Cloudflare service does not supply that entitlement. O2O availability alone does not enable custom certificate uploads.
Before you start
This integration connects your website to verified organization identity—a foundation for your SEO and AEO strategy. See how QWAC fits into search and AI discovery.
- Administrator access to your HubSpot domain settings and your own Cloudflare account
- An active Cloudflare Business or Enterprise zone for your domain
- A connected custom hostname with working HTTPS at your host, plus valid fallback SSL coverage
- Your own DigiCert CertCentral Europe QWAC account with an API key and delegated representative approval, or a Sectigo QWAC-enabled ACME account with EAB credentials, plus Cloudflare CSR access if you choose Cloudflare-held keys
- Completed issuer business verification and an active billing arrangement or subscription
- An active QWAC.com managed service
Visitors reach your Cloudflare zone first, then HubSpot. QWAC.com deploys the certificate to your zone and checks which certificate is actually served. Your provider’s hosting and SSL configuration stay in place.
Account setup time does not include provider identity checks, certificate issuance, or managed-service activation.
Enable O2O for HubSpot
- Complete HubSpot’s domain and reverse proxy setup. Copy the exact CNAME target provided for your account.
- In your own Cloudflare zone, create or update the website’s CNAME to that target and set it to Proxied (orange cloud).
- Check the website and any HubSpot forms before continuing.
| Type | Name | Target | Proxy status |
|---|---|---|---|
| CNAME | Your HubSpot website hostname | <HUBID>.sites-proxy.hscoscdn<##>.net | Proxied (orange cloud) |
The target shown is a pattern, not a value to paste. Your HubSpot proxy configuration determines the actual target.
The selected hostname has a proxied CNAME to the provider’s target, the provider has activated it, and your website works at that address.
Check your domain before requesting a certificate
- Confirm your own Cloudflare zone is Active and on Business or Enterprise. If it is on Free or Pro, upgrade it before continuing.
- Keep the host’s working SSL setup and an active fallback certificate. Test the exact hostname you plan to certify, including any redirects.
- Choose one exact hostname per setup. A certificate for www.example.com does not cover example.com; check where visitors land after a redirect.
A DNS record alone does not prove which certificate visitors will receive. We verify the live certificate after deployment; a certificate that has only been uploaded is not yet reported as Active.
The host connection is working and your Cloudflare plan supports custom certificates.
Connect your website in QWAC.com
- Choose Connect with Cloudflare and authorize access to the domains you want to manage.
- Select your Cloudflare domain, then the proxied website hostname. The zone ID is read automatically.
- If your domain is on Free or Pro, use Upgrade Cloudflare plan, complete the upgrade in Cloudflare, then select I’ve updated it — recheck. QWAC.com cannot continue until the domain is active on Business or Enterprise.
- We check custom-certificate capacity before you continue to the issuer. A full or unreadable allocation must be resolved first.
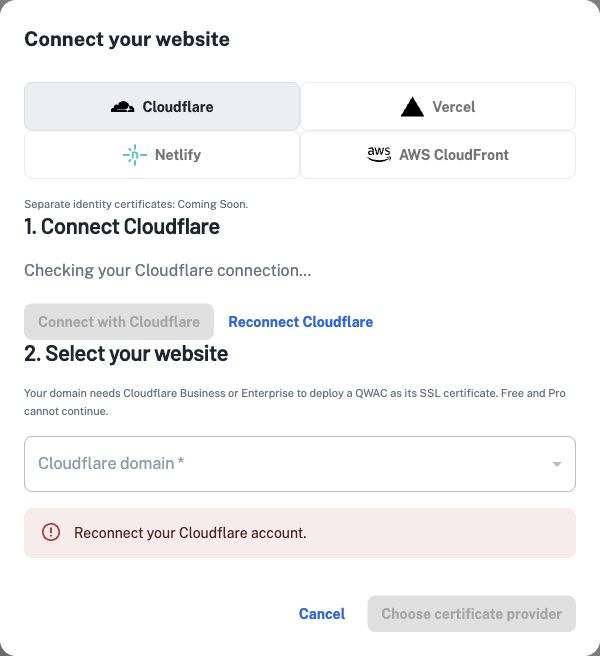
Your QWAC.com subscription does not upgrade Cloudflare. The plan is checked for each domain, even when your hosting provider includes Cloudflare in its service.
Your website is connected to its Cloudflare zone without copying any IDs.
Connect your certificate provider
- Choose DigiCert Europe or Sectigo, then select the QWAC or EV product purchased from your issuer. Your issuer verifies your business and determines product eligibility.
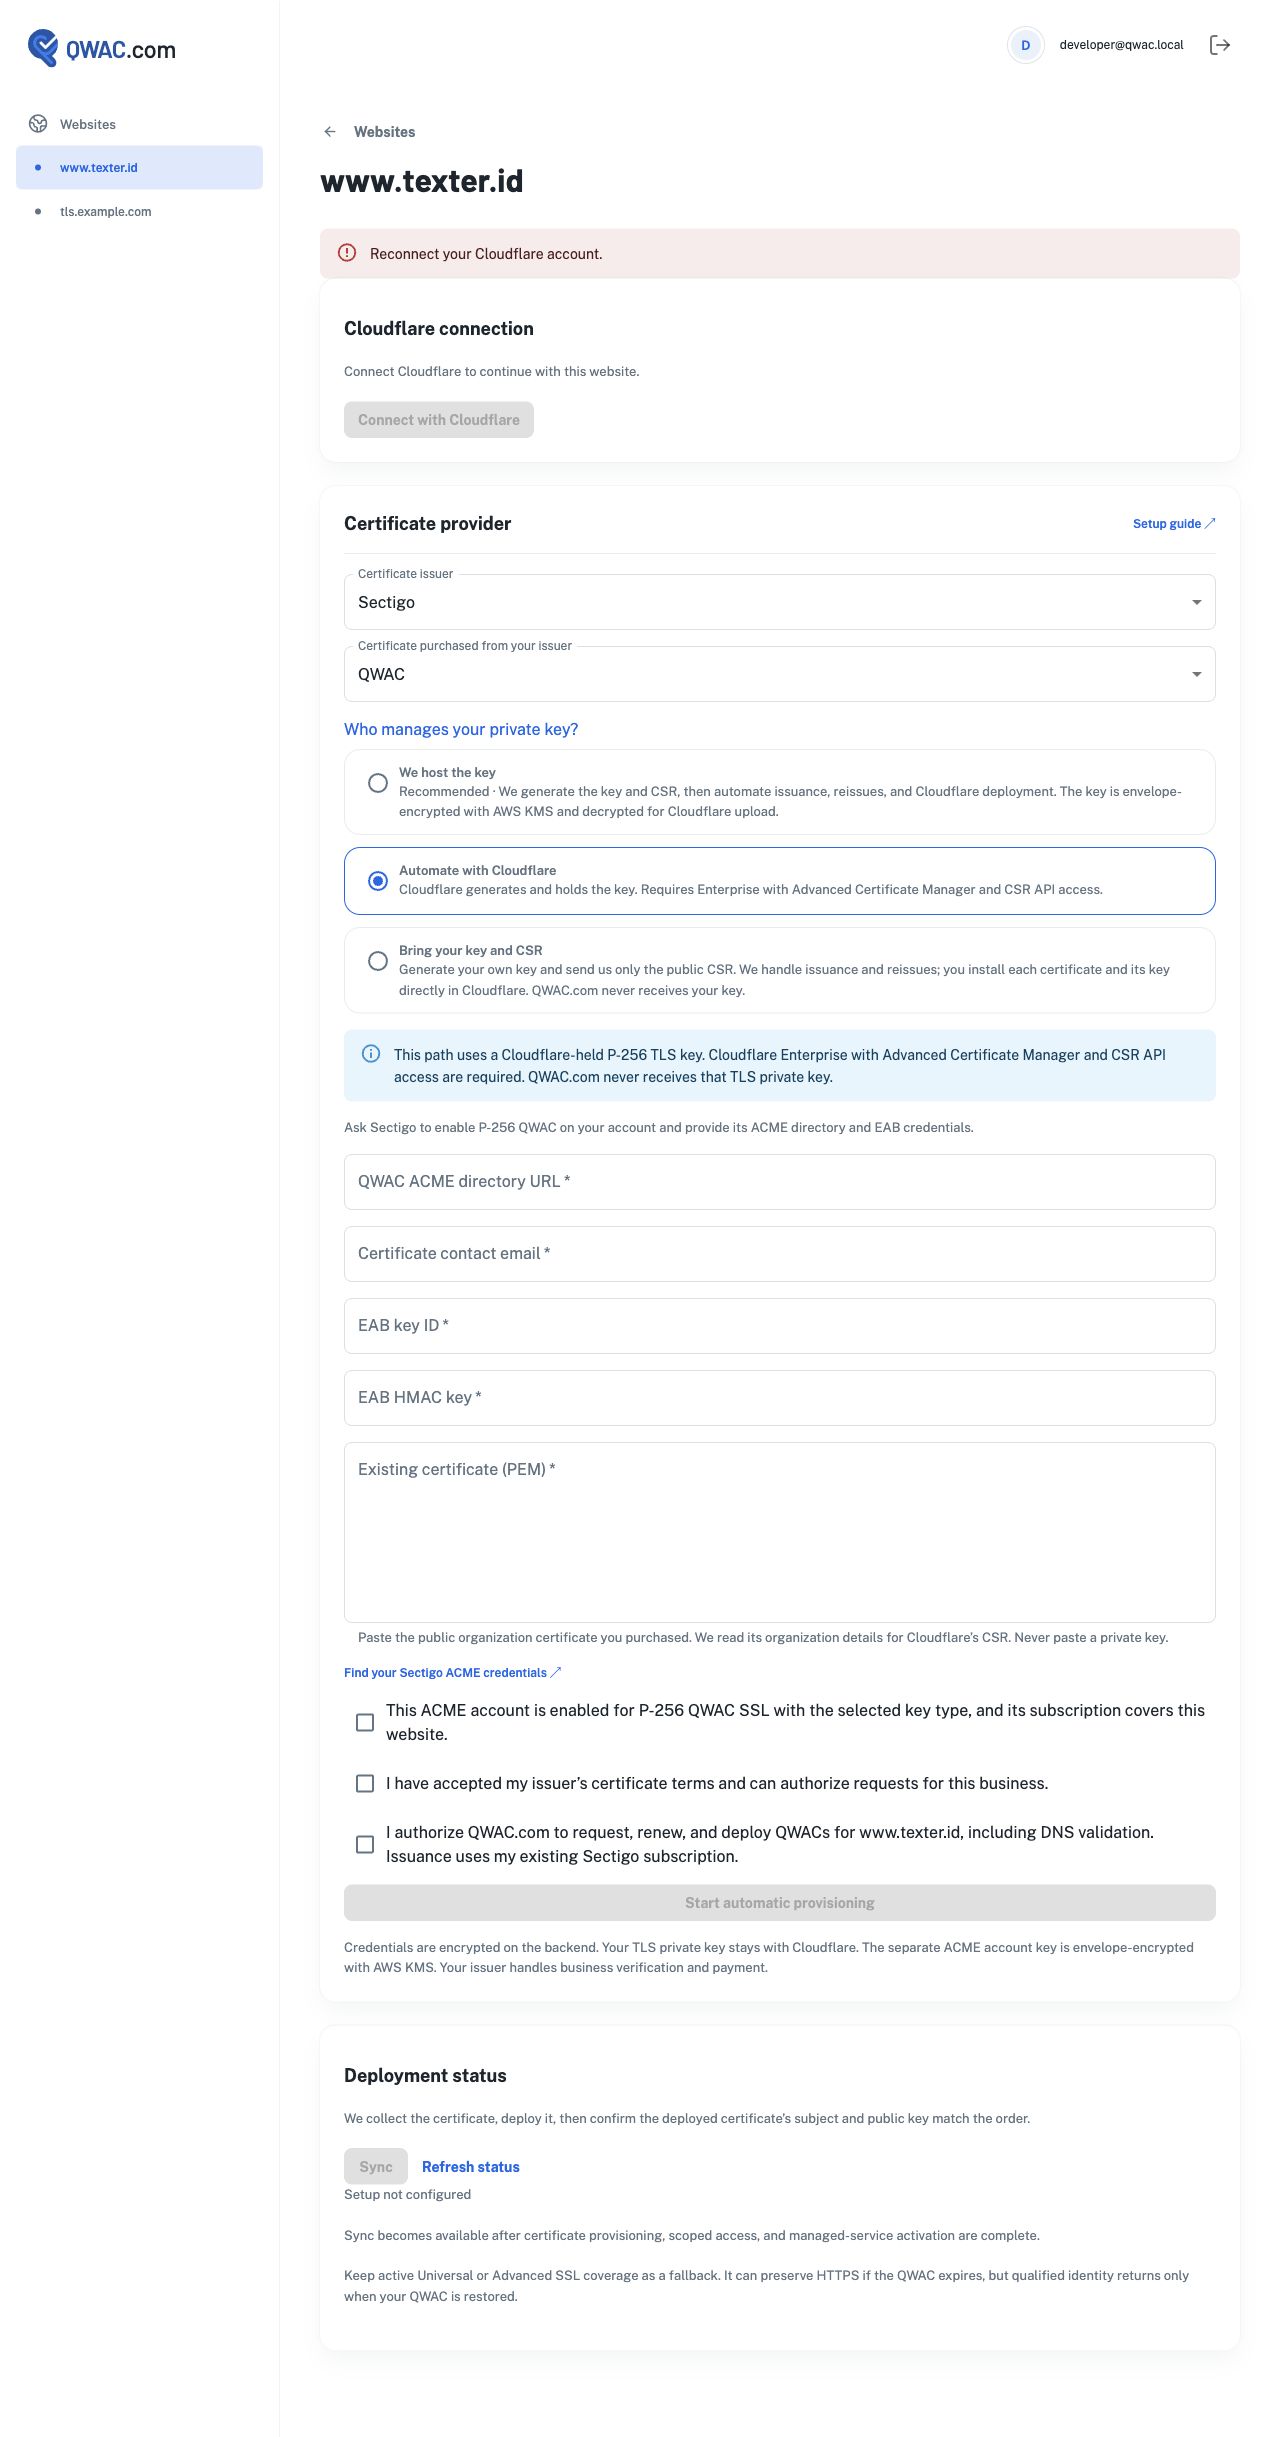
- Choose We host the key, Automate with Cloudflare (Sectigo Enterprise), or Bring your key and CSR. The last option keeps your key out of QWAC.com and requires installing each issued certificate in Cloudflare yourself.
- For DigiCert, enter your CertCentral Europe API key, choose Read organizations, and select your business. Enable delegated representative approval in your issuer account.
- For Sectigo, enter the QWAC ACME directory, account email, EAB key ID, and HMAC key supplied by your issuer. Use credentials for the selected QWAC or EV product. For Cloudflare-held keys, provide your existing public organization certificate so we can read the details required for its CSR.
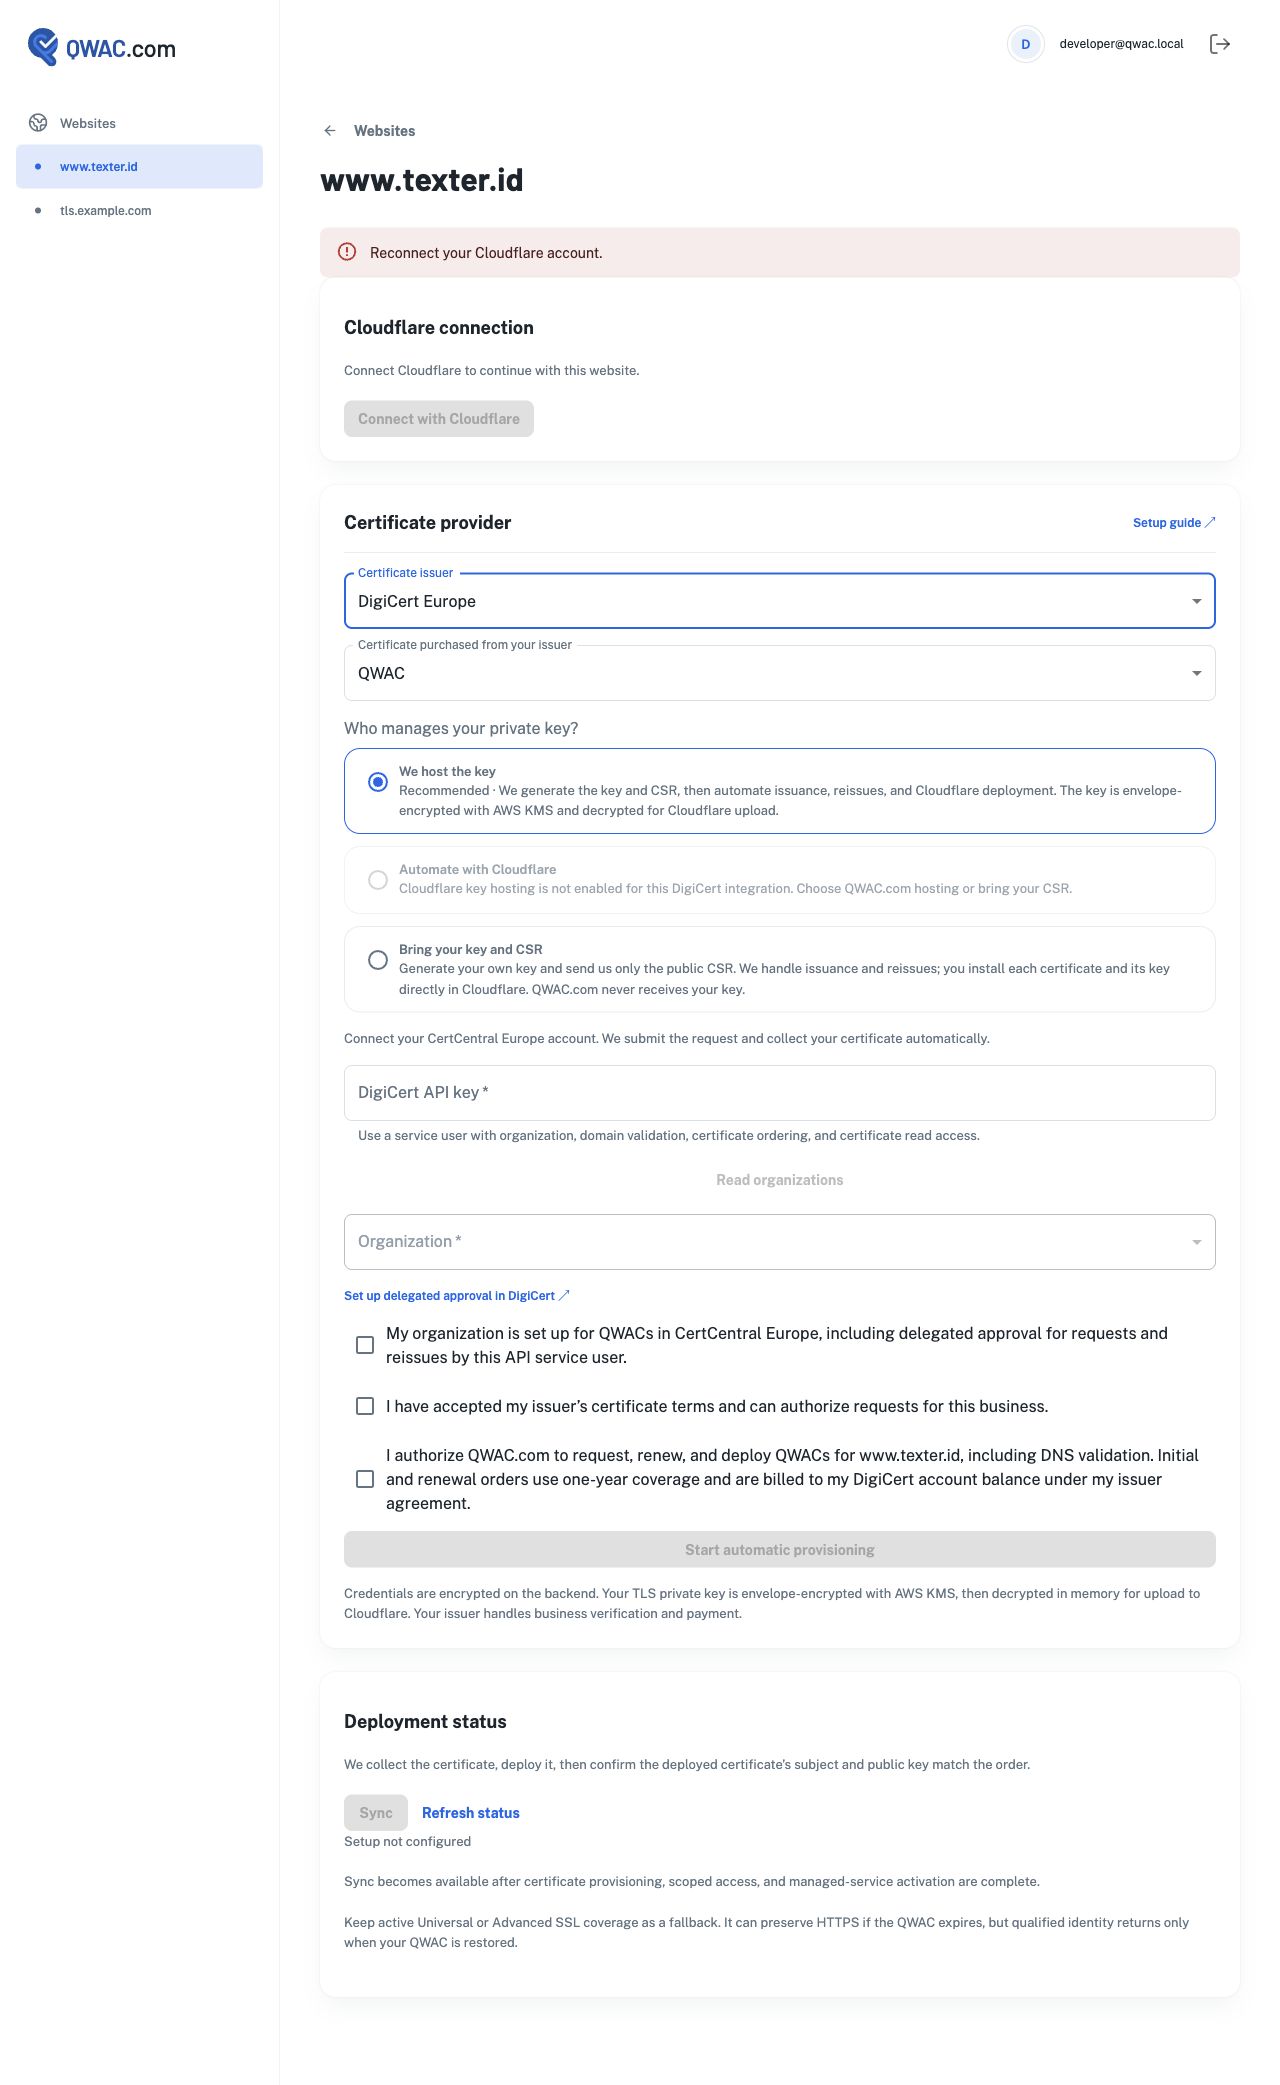
Use an account enabled for the selected product: public website QWACs, or EV if you have agreed to an eligible fallback. A PSD2-only certificate is not sufficient for this setup. Credentials are encrypted on the backend.
Your issuer account is ready to authorize. No certificate is ordered just by viewing the form or reading organizations.
Authorize automatic provisioning
- Confirm that your issuer account is ready, that you accept its terms, and that QWAC.com may request, renew, and deploy certificates for this website.
- Review the issuer billing note. DigiCert orders use your account balance under your issuer agreement; Sectigo uses your existing QWAC subscription.
- Choose Start automatic provisioning. QWAC.com-hosted keys use envelope encryption with AWS KMS and are decrypted for upload to Cloudflare. Cloudflare-held keys stay at Cloudflare. Customer-held keys stay with you until you upload them directly to Cloudflare. We send the public CSR to your issuer. We publish DNS verification records when Cloudflare manages DNS; otherwise, we show and email the TXT records for you to add.
Bring your key and CSR automates issuer requests, but requires you to install each issued certificate in Cloudflare. Choose a hosted-key option for automatic installation.
Your workspace shows issuance progress. Customers bringing their own key submit a public CSR; both hosted options prepare it automatically.
Complete any issuer identity checks
- Watch the progress panel for any action your issuer needs.
- Complete business or authorized-representative checks directly with the issuer when requested.
- We continue checking the request and collect the certificate when it is issued.
Identity approval is controlled by the issuer. Automation cannot skip those checks. Dashboard and email alerts help you follow up.
We confirm that the certificate’s hostname and public key match the request, and validate its issuer and the selected QWAC or EV certificate profile.
Check deployment and keep renewal enabled
- Hosted-key options upload the validated certificate automatically. If you bring your key and CSR, download the issued certificate and install it with your private key directly in Cloudflare. Then select Verify Cloudflare installation.
- Wait for Active and a verified timestamp. Sync asks the background service to check again.
- Leave automatic provisioning enabled for renewals. Use Update credentials / resume if access changes, or Pause automation to stop future work.
- DigiCert reissues within paid coverage; a new renewal order is used when that coverage ends. Identity approval remains controlled by your issuer.
Pausing does not remove the certificate already deployed. Keep a valid fallback certificate on Cloudflare.
Key generation, issuance, deployment, and renewal are managed together. Your workspace shows expiration and any actions needed.
Bring your key and CSR
Keep your private key on your own system. QWAC.com needs only the public certificate signing request (CSR). Ask your administrator to generate an RSA-3072 key and a CSR for exactly your website hostname.
Example commands for your administrator
umask 077
openssl req -new -newkey rsa:3072 -nodes   -keyout example.com.key -out example.com.csr   -subj "/CN=example.com" -addext "subjectAltName=DNS:example.com"
Replace example.com with your selected hostname. Keep the .key file private and backed up. Only select the .csr file in QWAC.com.
- Choose your issuer, then Bring your key and CSR.
- Paste or select the public CSR. Connect your issuer account for the selected QWAC or EV product and authorize the request.
- When notified, download the issued certificate from your workspace.
- Open your domain in Cloudflare → SSL/TLS → Edge Certificates. Upload or replace the custom certificate, its matching private key, and CA chain. Select Modern compatibility.
- Return to QWAC.com and select Verify Cloudflare installation. Repeat installation after every reissue.
Your key is uploaded directly to Cloudflare, which holds it for TLS serving. QWAC.com never receives it. This option does not use Keyless SSL.
Cloudflare installation instructions ↗Troubleshooting
My host already includes Cloudflare. Do I still need a plan?
Yes. QWAC.com uploads the certificate into your own Cloudflare zone. Your host’s subscription does not grant your zone custom-certificate capacity. Follow the plan requirements at the top of this guide.
My website is missing from QWAC.com
Check that you authorized the correct Cloudflare account and domain, that the domain is active on a supported plan, and that this exact hostname has a proxied CNAME. Then select Recheck Cloudflare.
My host is showing a domain or SSL error
Resolve the host connection before ordering. Recheck the target and domain verification in HubSpot, and use its O2O instructions above. Do not remove a working certificate to force deployment.
What if my QWAC expires?
Cloudflare can switch to another active certificate covering the hostname, including Universal SSL. The switch can happen within 24 hours before expiry when a replacement is available. HTTPS can stay available, but the ordinary fallback does not carry your qualified identity. Without valid fallback coverage, HTTPS may fail.
Cloudflare is on Free or Pro
Upgrade your domain in Cloudflare to Business or Enterprise, then select Recheck Cloudflare in QWAC.com. Pro is not sufficient. The portal blocks certificate setup until a fresh plan and capacity check succeeds.
The issuer is waiting for approval
Complete the identity or representative approval requested in your issuer account. DigiCert automation needs delegated representative approval. The service continues polling and alerts you if action is required.
My API key or ACME credentials changed
Choose Update credentials / resume and reauthorize using credentials for the same issuer account. An account change requires support review so an existing order is not abandoned.
The order outcome needs recovery
Contact support. We stop after an interrupted order submission to avoid placing a duplicate order. Support checks your issuer account before resuming.
The certificate does not match
Check that the request is for this exact website and uses the QWAC.com CSR. The service keeps the current deployment when a replacement fails validation.
The status says propagating
Cloudflare may still be deploying, or another certificate may take priority. We only report Active after the expected certificate is observed on public TLS connections.
Official references
Provider screens and requirements change. These links are the source of truth for their platform settings.
HubSpot O2O guideCloudflare certificate selectionCloudflare custom certificate expiration and fallbackCloudflare custom certificate availabilityCloudflare upload and replacement requirementsCloudflare certificate update APIDigiCert Europe QWAC APIDigiCert delegated representative approvalSectigo ACME certificate supportCloudflare CSR plans and custodyKeep this guide handy.
Start with your hosting account, then choose your issuer and how to manage your key.
Register your interest