
Use an enabled standard distribution with one custom hostname and SNI. Multiple aliases, wildcard names, staging distributions, and continuous deployment need a coverage review. Certificates must be imported in US East (N. Virginia), even if your origin is elsewhere.
Before you start
This integration connects your website to verified organization identity—a foundation for your SEO and AEO strategy. See how QWAC fits into search and AI discovery.
- An AWS account with a working CloudFront distribution and one custom hostname
- An administrator who can create an IAM role for certificate management
- Your enabled DigiCert Europe or Sectigo account and completed business verification
- Access to your DNS provider and an active QWAC.com managed service
Your certificate is imported into AWS Certificate Manager (ACM) in us-east-1 and selected as the distribution’s viewer certificate. Reissues reuse that ACM certificate ARN. QWAC.com confirms the certificate served to visitors after propagation.
Account setup time does not include provider identity checks, certificate issuance, or managed-service activation.
Check your distribution
- Choose the distribution serving your website. Check its alternate domain name and verify the site loads over HTTPS.
- Use a standard distribution with exactly one custom hostname, SNI, and no staging or continuous deployment policy.
- Keep your current working certificate. QWAC.com creates a dedicated imported certificate for this website; it does not overwrite an unrelated ACM certificate.
The distribution and its hostname are ready.
Connect your AWS role
- Enter the 12-digit AWS account ID.
- Select Get AWS role setup. Give your AWS administrator the generated trust policy and the permissions example linked below.
- Replace YOUR_AWS_ACCOUNT_ID and YOUR_DISTRIBUTION_ID in the permissions example. Create an IAM role using those permissions and the exact generated trust policy, including its external ID.
- Paste the role ARN into QWAC.com and select Connect AWS CloudFront. Select your distribution and hostname.
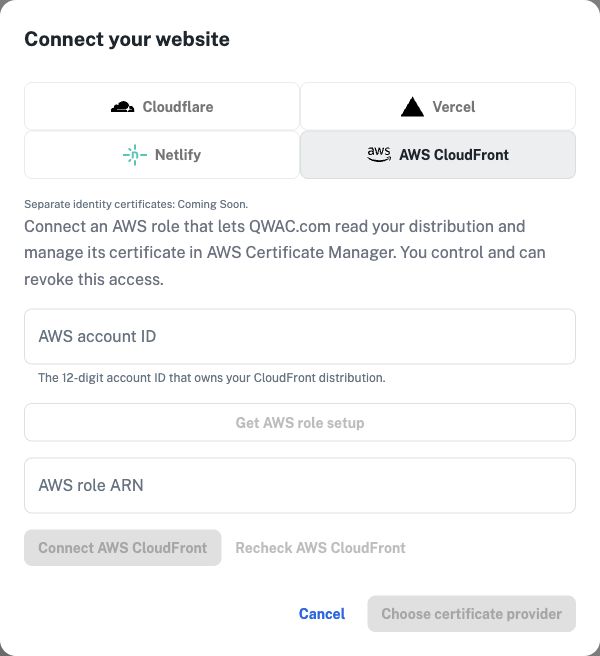
No customer AWS access keys are pasted into QWAC.com. The external ID binds role access to your QWAC.com account. You can revoke the role whenever needed.
QWAC.com can assume the approved role and read your distribution.
Authorize your issuer
- Connect your own DigiCert Europe API account or enabled Sectigo ACME account.
- Choose We host the key for automatic ACM import, or Bring your key and CSR for manual installation.
- Select your purchased QWAC or EV product and review issuer fees before authorizing the request.
Hosted keys use envelope encryption with AWS KMS and are decrypted in memory for import into ACM. ACM stores the imported key for CloudFront. Cloudflare-generated keys are not used.
The selected certificate request is authorized.
Complete domain and business checks
- Add the TXT record shown in QWAC.com at your authoritative DNS provider, then select Check DNS.
- Complete the issuer’s business verification or authorized representative approval.
- Follow the new instructions whenever reissue validation is required; email alerts accompany dashboard actions.
DNS updates are manual in this integration, including for Route 53. Your hosting role does not receive DNS write access.
The issuer approves and issues the certificate.
Import, deploy, and verify
- For hosted keys, QWAC.com imports the certificate and matching key into ACM in US East (N. Virginia). It then updates only the distribution’s viewer certificate settings.
- For your own CSR, import the downloaded certificate and key into ACM yourself, then attach it to the distribution.
- Allow CloudFront to finish deployment. Select Sync; Active requires the expected certificate to be visible over public TLS.
- Replacements are reimported into the dedicated ACM certificate ARN, preserving the CloudFront association.
AWS does not automatically renew imported certificates. Resolve renewal alerts before expiry; an expired certificate can break HTTPS.
CloudFront serves the issued certificate and renewal is tracked.
Bring your key and CSR
Keep your private key on your own system. QWAC.com needs only the public certificate signing request (CSR). Ask your administrator to generate an RSA-3072 key and a CSR for exactly your website hostname.
Example commands for your administrator
umask 077
openssl req -new -newkey rsa:3072 -nodes   -keyout example.com.key -out example.com.csr   -subj "/CN=example.com" -addext "subjectAltName=DNS:example.com"
Replace example.com with your selected hostname. Keep the .key file private and backed up. Only select the .csr file in QWAC.com.
- Choose your issuer, then Bring your key and CSR.
- Paste or select the public CSR. Connect your issuer account for the selected QWAC or EV product and authorize the request.
- When notified, download the issued certificate from your workspace.
- In AWS Certificate Manager, select US East (N. Virginia), then import the issued certificate, its matching private key, and intermediate CA chain. Attach that certificate to your CloudFront distribution. For reissues, reimport into the same ACM certificate ARN.
- Return to QWAC.com and select Verify AWS CloudFront installation. Repeat installation after every reissue.
Your key is uploaded directly to AWS CloudFront, which holds it for TLS serving. QWAC.com never receives it. This option does not use Keyless SSL.
AWS CloudFront installation instructions ↗Troubleshooting
AWS role setup is unavailable
QWAC.com’s operator must configure its AWS delivery role before a customer trust policy can be generated. Contact onboarding; no certificate order has been placed.
Connection was denied
Check the account ID, role ARN, principal, external ID, and attached permissions. The trust policy must match the one generated for your account.
My distribution needs review
Only enabled standard distributions with one exact custom hostname and SNI are supported automatically. Multiple aliases need matching certificate coverage before replacement.
The certificate is not available in CloudFront
Check that it was imported into ACM in US East (N. Virginia), in the distribution’s AWS account, and covers the exact hostname.
A deployment is still propagating
An ACM import does not immediately change every edge location. We wait for CloudFront deployment and check public TLS before reporting Active.
An import response was lost
Contact support before importing again. Support can recover the matching, tagged ACM certificate and resume the saved deployment without creating duplicates.
Official references
Provider screens and requirements change. These links are the source of truth for their platform settings.
CloudFront certificate requirementsImport a certificate into ACMReimport into the same ACM certificateAWS role external IDsKeep this guide handy.
Start with your hosting account, then choose your issuer and how to manage your key.
Register your interest